
20 Cool Science Experiments You Can Do with Dry Ice
Dry ice is not only a powerful cooling agent but also an incredible tool for science experiments that engage both kids and adults. Its ability to sublimate directly from solid to gas at –78.5°C (–109.3°F) makes it perfect for demonstrating physics, chemistry, and even some fun biology concepts. The dramatic fog, rapid freezing, and CO₂ gas expansion it produces captivate learners while providing hands-on educational experiences.
From simple classroom demonstrations to home experiments, dry ice offers a safe way to explore gas behavior, temperature effects, and chemical reactions—provided proper safety measures are followed. Wearing insulated gloves, using tongs, and keeping the workspace ventilated are essential for safe handling. This article explores 20 cool science experiments you can do with dry ice, combining entertainment and education in exciting ways.
Making Fog and Smoke Effects
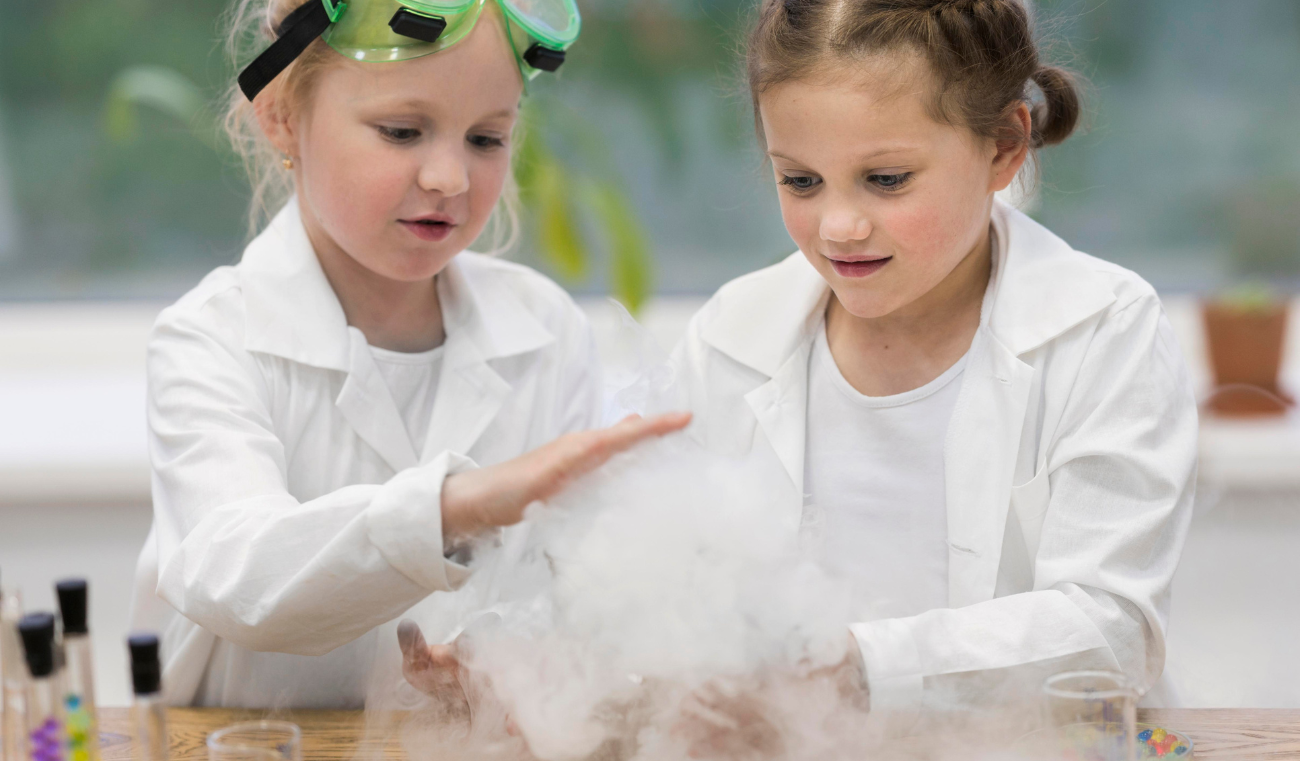
One of the most popular dry ice experiments is creating fog and smoke effects. When dry ice is placed in warm or hot water, it sublimates rapidly, releasing dense carbon dioxide gas. The gas condenses water vapor in the air, forming a thick, low-lying fog that spills over containers and creates a dramatic visual effect.
This experiment is simple, safe, and highly engaging. It demonstrates the sublimation process, where a solid turns directly into a gas without passing through a liquid state. Children can observe the fog spreading and understand the principles of gas density—CO₂ is heavier than air, which is why the fog stays low.
This fog effect is not just visually striking; it can also be used in educational settings to explain topics like gas behavior, states of matter, and condensation. With proper supervision and safety measures, it is an accessible experiment that combines science, fun, and creativity, perfect for classrooms, science fairs, or home demonstrations.
Bubble Experiments
Dry ice can also be used to create giant fog-filled bubbles, an experiment that fascinates learners of all ages. By adding a small amount of dish soap to water containing dry ice, you can form large bubbles that trap the CO₂ fog inside. As the gas escapes slowly, the bubbles inflate and eventually pop, releasing a cloud of vapor.
This experiment demonstrates principles of gas expansion and surface tension. The CO₂ gas produced by the sublimating dry ice inflates the bubble, while the soap film stretches to contain it. Kids and students can observe the bubbles growing, floating, and bursting, making abstract scientific concepts tangible and memorable.
Additionally, bubble experiments can be used to discuss topics like density differences between gases, the behavior of carbon dioxide, and why certain gases are heavier than air. With supervision and careful handling, creating fog-filled bubbles is a safe, interactive, and visually stunning way to explore science concepts.
Inflating Balloons with CO₂
A fun and educational experiment involves inflating balloons using dry ice. As dry ice sublimates, it releases carbon dioxide gas, which can fill balloons without the need for blowing air manually. This demonstrates gas expansion and the behavior of carbon dioxide in a confined space.
To perform this experiment safely, place small pieces of dry ice in a balloon using a funnel or tongs, and loosely secure the balloon over a container to allow initial gas release. As the CO₂ sublimates, the balloon inflates gradually. This provides a visual representation of how solids can transform into gas and expand rapidly.
This experiment also teaches students about gas density and pressure. CO₂ is heavier than air, so the balloon may initially sit lower, but as more gas fills it, the balloon becomes buoyant. Supervised use of this method offers a hands-on lesson in physics and chemistry, combining observation, measurement, and scientific reasoning in a fun, interactive format.
Dry Ice in Water
Placing dry ice in water is a classic and captivating experiment. The warm water accelerates sublimation, creating vigorous bubbling, thick fog, and dramatic visual effects. This experiment is a clear demonstration of sublimation and the interaction of gases with liquids.
It can also be used to explore the concept of pressure changes. As the CO₂ gas is produced, it displaces air and creates bubbles, which illustrate how gases expand to occupy available space. This experiment can be modified to include colored water or safe dyes to make the bubbling effect more visually striking, adding a layer of engagement for students.
Dry ice in water is also a gateway to other experiments, such as combining with soap to create fog-filled bubbles or exploring floating dry ice pieces. While visually impressive, it is important to handle the experiment safely: always wear gloves, avoid direct skin contact with the dry ice, and conduct the activity in a well-ventilated area to prevent CO₂ buildup.
Sound Experiments
Dry ice can be used to create fascinating sound experiments, demonstrating the effects of vibrations and resonances. By placing a piece of dry ice on a metal surface or drum, the rapid sublimation can cause vibrations that produce eerie, high-pitched sounds. This is due to the CO₂ gas rapidly escaping and interacting with the surface beneath it.
These experiments are excellent for teaching concepts like frequency, resonance, and sound propagation. By adjusting the size of the dry ice or the surface it contacts, learners can observe how different variables affect the pitch and volume of the sound. This hands-on approach makes abstract principles of physics tangible and engaging.
Safety is crucial: always ensure that observers maintain a safe distance, and gloves or tongs are used to handle dry ice. By combining visual fog effects with sound demonstrations, this experiment captivates learners’ senses and makes science both entertaining and educational.
Freeze Bubbles Instantly
Another visually stunning experiment involves freezing soap bubbles with dry ice. By carefully holding a bubble near a cold surface or using the extreme low temperature of sublimating dry ice, you can observe the bubble freezing almost instantly. This demonstrates the effects of extreme cold on liquids and surface tension.
Frozen bubbles illustrate how materials respond to rapid temperature changes. The thin film of soap solidifies, creating beautiful crystalline patterns and demonstrating the brittleness that occurs at very low temperatures. This experiment teaches children and students about phase changes, freezing points, and molecular behavior in a highly visual and interactive way.
It’s important to handle the bubble and dry ice with care to avoid burns or frostbite. When performed safely, freezing bubbles instantly combines artistry and science, providing a memorable and educational experience that reinforces physics and chemistry concepts in a playful format.
Dry Ice Rockets
Dry ice rockets are a thrilling way to explore gas expansion and propulsion. By placing small pieces of dry ice into a sealed container, such as a film canister, and adding a little warm water, the sublimating CO₂ gas builds up pressure inside. Eventually, the container launches like a miniature rocket.
This experiment demonstrates Newton’s third law of motion: for every action, there is an equal and opposite reaction. The escaping CO₂ gas propels the container upward, making physics concepts tangible and exciting. It’s perfect for classrooms, science fairs, or supervised home experiments, providing a memorable hands-on lesson in pressure, gas behavior, and motion.
Safety precautions are critical: always perform this experiment outdoors, use protective eyewear, and never point the container at people or fragile objects. By following safety rules, dry ice rockets offer an engaging, interactive way to teach the principles of physics while having fun with science.
Carbonation and Fizzy Reactions
Dry ice can also enhance chemical reactions and create fizzy, bubbling effects in liquids. When added to water or safe beverage solutions, it releases carbon dioxide, which carbonates the liquid and produces dramatic bubbles. This is a fun way to teach about gas solubility, chemical reactions, and the behavior of CO₂ under different conditions.
This experiment allows students to observe how gas interacts with liquids, creating fizz and bubbles, while explaining principles like gas expansion, pressure, and saturation. It’s also commonly used in demonstrations of “volcanic eruptions” or other visually exciting chemical reactions, making abstract chemistry concepts more accessible.
Proper handling is essential: dry ice should not be ingested directly, and gloves or tongs must be used to prevent cold burns. When conducted safely, carbonation experiments are educational, visually appealing, and reinforce the practical applications of dry ice in science.
Floating Bubbles
Floating bubbles filled with dry ice fog provide a captivating way to explore gas density and buoyancy. By creating bubbles using a soap solution and trapping CO₂ from sublimating dry ice inside, the bubbles can hover and slowly drift, demonstrating that carbon dioxide is denser than air.
This experiment is excellent for teaching concepts like density, gas displacement, and the behavior of different gases in a controlled environment. Students can observe how bubbles rise or sink depending on the concentration of CO₂ and air inside. Additionally, the slow release of fog from the bubble adds a visual element that reinforces understanding of gas movement and sublimation.
Safety is important: ensure the bubbles are not ingested, and keep hands protected from direct dry ice contact. This interactive and visual experiment makes learning about gases both fun and memorable, ideal for classrooms, home demonstrations, or science parties.
Fog in a Jar
Creating fog in a jar is a simple yet effective dry ice experiment that visually demonstrates gas behavior and condensation. By placing small pieces of dry ice in a jar with warm water, CO₂ gas is produced, and the surrounding moisture condenses into thick, low-lying fog.
This experiment helps students and children understand sublimation, gas expansion, and the condensation process in a controlled, safe environment. It can also be used to illustrate how gases interact with liquids and the surrounding air, making abstract scientific concepts tangible.
The fog in a jar can be enhanced with colored water or small LEDs to make the demonstration more engaging, particularly for science fairs or interactive lessons. Proper ventilation and protective gear are essential to ensure safety while performing this visually striking experiment.
Dry Ice Sculptures
Dry ice can be used to create temporary sculptures, offering a visually striking way to explore its properties. By carefully carving or shaping blocks of dry ice using appropriate tools and protective gloves, students and enthusiasts can create geometric shapes, abstract designs, or themed figures for experiments or displays.
This activity demonstrates the sublimation process, as the sculptures slowly release CO₂ gas and shrink over time. It also teaches lessons about handling extreme cold safely and observing physical changes in solids. Dry ice sculpting combines artistic creativity with scientific principles, making it a perfect STEM activity for classrooms, parties, or demonstrations.
Safety precautions are critical: gloves, tongs, and eye protection are mandatory to avoid frostbite or injury. When handled correctly, dry ice sculptures are a fun, educational, and memorable way to explore science visually and interactively.
Ice Cream Making
One of the most delicious dry ice experiments is making ice cream instantly. Dry ice rapidly freezes a mixture of cream, sugar, and flavorings, creating a smooth and creamy dessert in minutes. This experiment demonstrates extreme cold, rapid freezing, and phase changes from liquid to solid.
Ice cream making with dry ice provides hands-on learning about temperature, freezing points, and safe handling of extreme cold. It also introduces concepts like crystal formation, showing how rapid freezing produces smaller ice crystals and a creamier texture compared to traditional methods.
To perform this experiment safely, always use gloves or tongs to handle dry ice, never ingest it directly, and allow sufficient time for sublimation before consuming the ice cream. This experiment combines science, food, and fun, making it highly engaging for children, students, and science enthusiasts alike.
Crumpling Paper with Cold
Dry ice can demonstrate the effect of extreme cold on materials like paper. By briefly exposing a sheet of paper to dry ice, you can observe how it becomes brittle and crumples easily. This experiment illustrates how temperature affects molecular structure and material properties.
This simple demonstration teaches students about thermal contraction and the relationship between cold and rigidity. It’s also a safe and engaging way to show physical changes without chemicals or complex equipment. By handling the paper with tongs or gloves, learners can safely explore the fascinating effects of low temperatures on everyday materials.
Through this experiment, abstract scientific concepts such as brittleness and molecular movement at low temperatures become tangible and memorable, making it an excellent addition to classroom or home science activities.
Shrinking Balloons
Shrinking balloons is another captivating dry ice experiment. By placing a balloon filled with air near dry ice, the gas inside contracts due to the cold temperature, causing the balloon to shrink visibly. This demonstrates the effects of temperature on gas volume and the principles of gas contraction.
This experiment offers a hands-on lesson in physics and thermodynamics. Students can see the immediate impact of cold on gases, reinforcing concepts such as Charles’s Law, which relates temperature and volume of gases. By observing and measuring the shrinkage, learners gain a clear understanding of how gases respond to environmental changes.
Safety is essential: ensure the balloon does not come into direct contact with dry ice, and supervise children during the demonstration. Shrinking balloons is an engaging and visually striking way to explore the behavior of gases in a fun, educational setting.
Temperature and Pressure Experiments
Dry ice is ideal for exploring the relationship between temperature and pressure. By placing dry ice in a sealed container, such as a soda bottle or small jar, you can observe how the sublimating CO₂ gas increases internal pressure. This demonstrates the principles of gas laws, particularly how temperature affects pressure when volume is constant.
Students can experiment by slightly warming the container or changing the size of the vessel to see how gas expansion varies. This hands-on activity reinforces abstract concepts like the ideal gas law and helps learners understand real-world applications of temperature and pressure in physics and chemistry.
Safety is crucial: never completely seal a container with dry ice inside, as pressure buildup can cause explosions. Use vented containers or perform the experiment in a controlled, supervised setting. With proper precautions, these experiments make learning about thermodynamics interactive, visual, and memorable.
Gas Expansion Demonstrations
Gas expansion demonstrations are another engaging way to explore dry ice properties. As dry ice sublimates, solid CO₂ transforms directly into gas, rapidly increasing in volume. This experiment allows learners to see how matter changes state and expands when heated or exposed to warmer environments.
Common demonstrations include inflating balloons, lifting small objects, or creating mini “explosions” in vented containers to illustrate the power of gas expansion. These activities provide a tangible understanding of molecular movement and volume changes during phase transitions.
Proper safety measures are essential: always use gloves, tongs, and protective eyewear, and conduct experiments in well-ventilated areas. Gas expansion demonstrations combine visual excitement with educational value, making complex concepts like sublimation, gas laws, and molecular kinetics accessible and engaging.
Volcano Experiment
The volcano experiment is a classic dry ice demonstration that excites students while teaching chemical reactions and gas expansion. By combining dry ice with safe substances like vinegar or baking soda solutions in a container, you can create erupting foamy “lava” and fog effects.
This experiment demonstrates how CO₂ gas interacts with liquids to produce bubbling and foaming reactions. Students learn about reaction rates, gas production, and the visible effects of sublimation in a fun and memorable way. It’s a safe, hands-on method to engage learners in chemistry concepts without requiring dangerous chemicals.
Safety is important: use gloves and tongs to handle dry ice, and ensure the experiment is conducted in a well-ventilated area. Proper precautions allow this activity to be both visually striking and educational.
Foggy Drink Presentation
Dry ice can be used to create visually appealing fog in beverages, perfect for demonstrating science in a culinary context. When placed in a separate compartment or mesh container, it produces dramatic vapor without contaminating the drink.
This experiment teaches gas sublimation, density, and the behavior of CO₂ in liquids. Students observe how heavier-than-air CO₂ gas sinks and creates low-lying fog, making abstract concepts concrete and entertaining.
Always ensure that dry ice is not ingested directly and use gloves or tongs for handling. With proper safety, foggy drink presentations combine science education with visual appeal, making learning exciting and interactive.
Dry Ice Bubbles on Water
Creating dry ice bubbles on water demonstrates the interaction between gases, liquids, and surface tension. By combining dry ice with soapy water, students can form floating bubbles filled with CO₂ fog, which hover and slowly release vapor over the water surface.
This experiment highlights gas density, sublimation, and molecular behavior. It also introduces surface chemistry concepts, as the soap film traps the gas and fog. The visual aspect makes the experiment highly engaging and memorable, particularly for younger learners.
Safety precautions include wearing gloves, avoiding ingestion, and ensuring adequate ventilation. When conducted correctly, dry ice bubbles on water provide a multisensory learning experience that blends physics, chemistry, and visual effects.
Color Change Reactions
Dry ice can enhance chemical experiments that involve color changes. By combining it with safe pH indicators, such as cabbage juice or universal indicator solutions, students can observe dramatic color shifts as CO₂ dissolves in water and forms carbonic acid.
This experiment teaches chemical reactions, acid-base interactions, and gas solubility in liquids. The vibrant visual feedback reinforces learning and makes abstract chemistry concepts more tangible.
Handle dry ice safely: always use gloves or tongs, and avoid direct contact with skin. With proper precautions, color change reactions using dry ice combine science education with visual excitement.
Conclusion
Dry ice offers a world of possibilities for science experiments that are both educational and visually captivating. From fog effects, bubbles, and rockets to ice cream making, sculptures, and chemical reactions, it demonstrates principles of sublimation, gas expansion, temperature effects, and molecular behavior.
By following safety protocols—using gloves, tongs, eye protection, and well-ventilated spaces—these 20 experiments provide hands-on learning while minimizing risks. Dry ice transforms ordinary lessons into interactive, memorable experiences, making complex scientific concepts accessible and fun.